


Selecting a conveyor belt cleaner is not simply adding a scraper. First identify what sticks to which belt surface, under which operating condition, and where the material causes trouble. Then check the belt, splice, head pulley, product, cleaning method and service access together. A model chosen from a catalogue may be difficult to replace or wash down in a Thai factory. This guide gives engineering, production, purchasing and quality teams a common way to compare proposals and accept an installed system.
Define the carryback problem and the target state
Carryback is material that remains on the belt after discharge and travels along the return run. It may fall onto return rollers, the frame, sensors or the floor. In food processing, residue may also create a cross-contamination concern. Dry dust, wet sticky material, oil film and sugary product need different approaches. Do not group them all under the word “dirt.”
Describe the symptom by location and condition: “wet fines fall from the return belt immediately after the head pulley and require floor cleaning every shift” is testable. “The conveyor is dirty” is not. Record representative photos and a baseline under the conditions when the problem occurs. Check upstream feed, tracking, belt damage, chute design and washdown practice too. If the root cause sits upstream, a new blade may only move the problem. Set a measurable target such as residue at a fixed observation point or cleaning time under a stated product and run duration. Avoid specifying “zero carryback” without defining how and when it is measured.
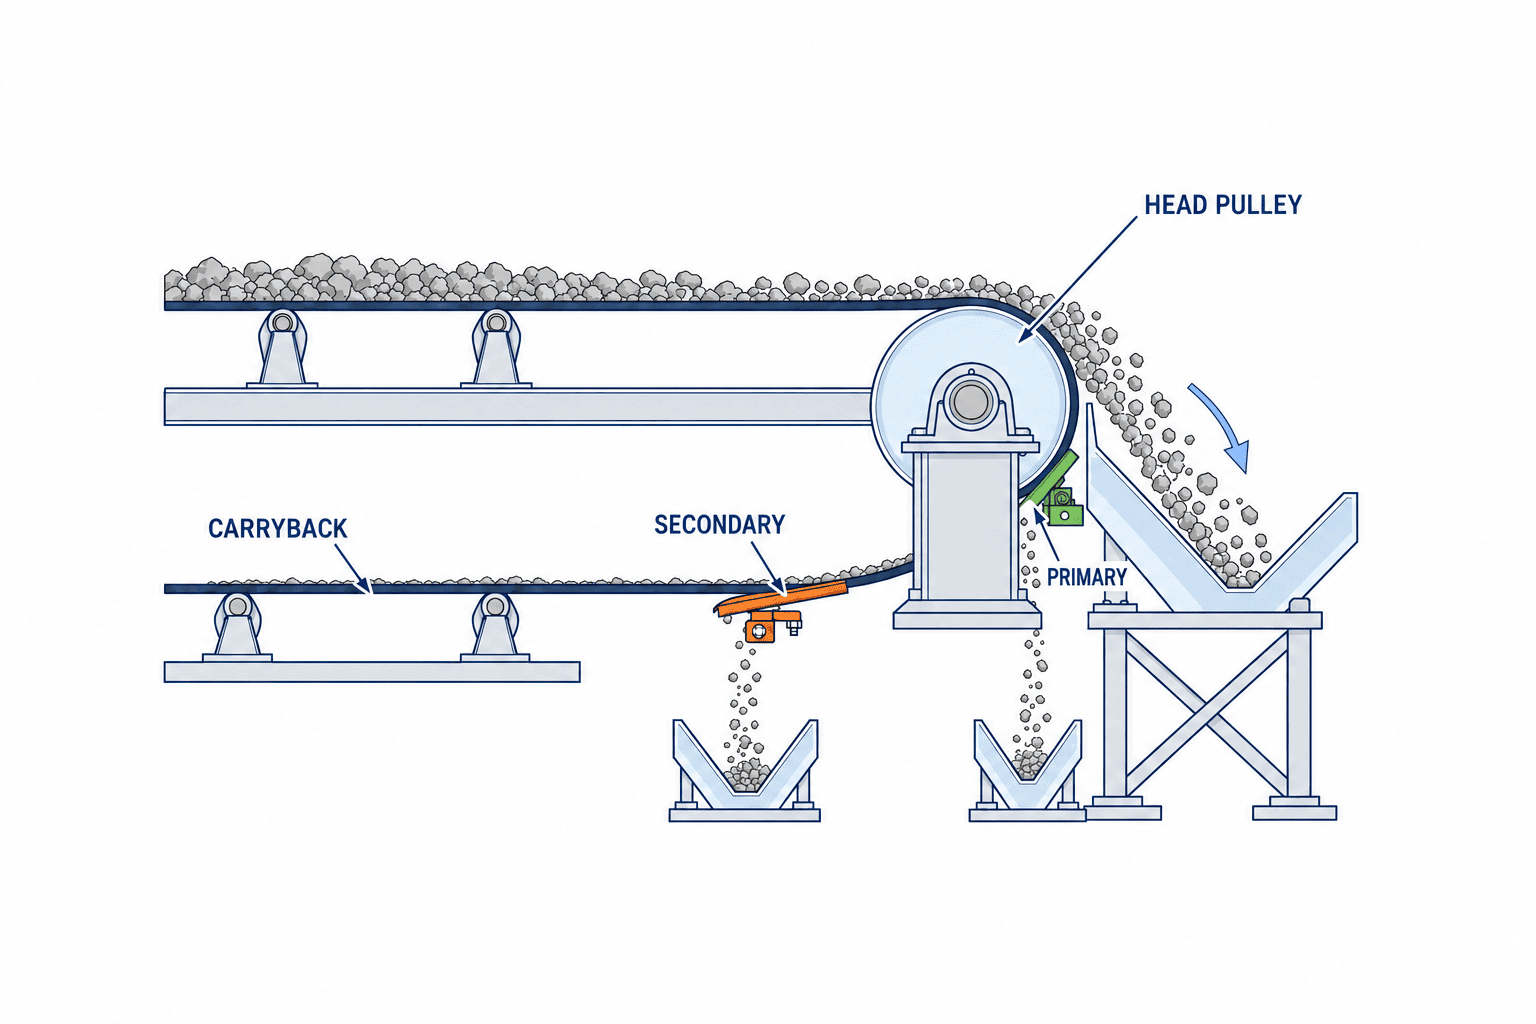
Primary versus secondary belt cleaners
A primary cleaner generally works near the head pulley after product leaves the belt, so removed material can often rejoin the discharge flow. A secondary cleaner works after the belt leaves the head pulley, removing finer residue on the return run. Flexco and Martin Engineering describe these different roles. Neither a single primary cleaner nor a primary–secondary pair guarantees a universal removal rate. The material, belt surface, available position and agreed target determine the configuration.
Review the layout before comparing product names. Can the primary blade contact the right area without interfering with the discharge stream? Where will the removed material actually fall? What receives material removed by the secondary? Moving the secondary farther downstream may make mounting easier, yet permit carryback to fall before it reaches the blade. If the return belt flaps or is not flat, tell the supplier and assess the support design. In the quotation, separate primary location, blade and tensioner; secondary location and support; and common guarding, inspection access and spares.
Collect the real machine data before requesting quotes
Flexco’s selection guidance and handbook, and Martin Engineering’s guide, call for more than belt width. They include belt speed, head pulley diameter, material path, material and moisture, splice, temperature, reverse travel and access. Keep nominal drawing dimensions separate from site measurements; modified conveyors often differ from their original drawings. Mark unknown values as unknown rather than guessing.
| Input | Why it matters | Evidence |
|---|---|---|
| Belt and frame widths | Effective blade width and bracket clearance | Dimensioned front view and photos |
| Head pulley and discharge geometry | Primary contact and recovery path | Side view and stopped-machine photo |
| Speed and reverse modes | Cleaner operating envelope and blade direction | Operating specification |
| Material and material-path width | Contact area, abrasion and stickiness | Sample and residue photos |
| Belt surface and splice | Risk of blade, belt or splice damage | Belt model and splice photo |
| Heat, water, chemicals, food contact | Material and sanitation compatibility | Cleaning procedure and chemical list |
| Guards and service space | Feasible adjustment and replacement | Layout and service route |
Record a short video under representative load if safe to do so from outside the guarded area. Capture changes between startup and steady running, before and after washing, and between dry and humid material conditions. A sample of the actual conveyed material is more useful than a generic material name.
Check belt surface, splice and reverse compatibility
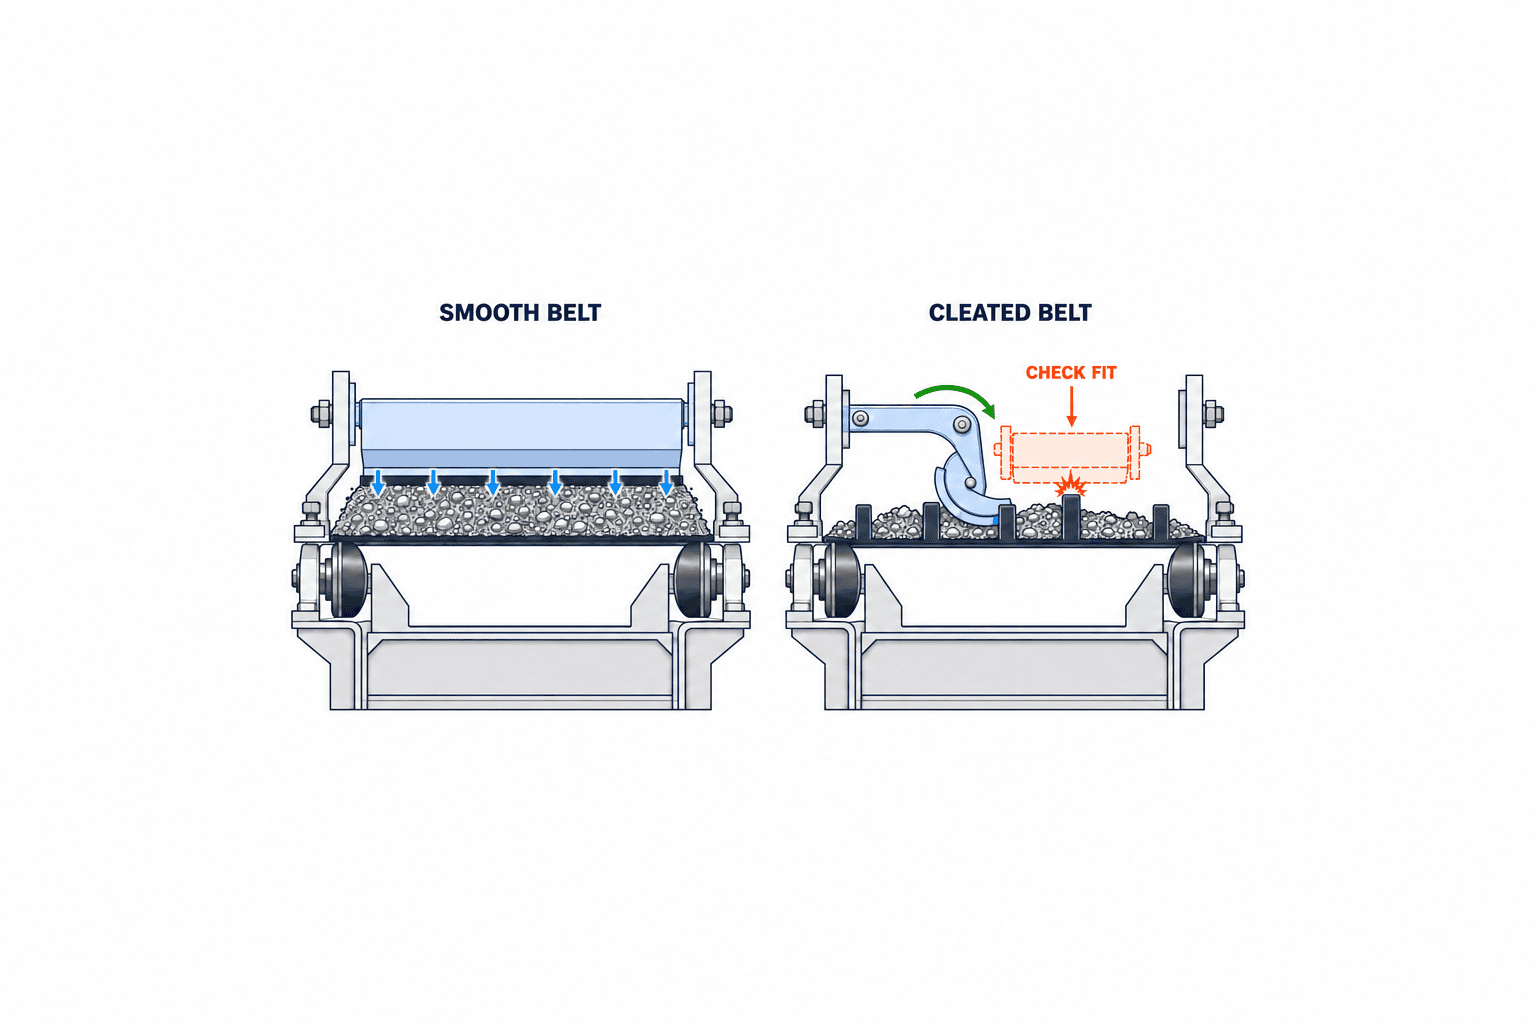
Do not apply a flat-belt blade to cleated, textured or modular belts without a compatibility check. A cleat can strike the blade. Flexco offers a dedicated cleated-belt design, which illustrates the need for a specific solution; it is not proof that every cleat geometry is suitable. Confirm cleat height, pitch and shape, belt material and the area that must be cleaned. Ask the belt maker about permitted contact and pressure on monolithic or modular belts.
Splices are another boundary. Document whether the splice is vulcanized or mechanical and whether any fastener protrudes. Ask the supplier to state the blade and tip design approved for that splice. An aggressive blade can damage the belt or splice, even if it removes more residue. During testing observe impact, noise and blade lift at every splice passage.
Declare any reverse motion, including short reverse jogs used to clear jams. Martin Engineering notes that some secondary blade angles are unsuitable for reverse operation. Confirm the specific product’s reverse rating and test the actual mode. If reverse travel must be prohibited, reflect that in the controls and operating procedure rather than relying on memory.
Compare blade materials by application, not hardness alone
Polymer and metal blade options differ, but the material name alone does not decide the best choice. Abrasiveness, stickiness, belt cover, splice, temperature, chemicals, food contact and cleaning practice interact. Request the exact blade material, its belt compatibility basis, replacement criteria and spare-part number. Do not copy another factory’s blade-life estimate into the purchase specification.
Contact pressure is not a “more is better” setting. Too little contact leaves residue; too much can add wear or heat. Require a drawing and procedure for tensioner setting, inspection and readjustment. Habasit’s hygienic scraper is one example of a product with adjustable pressure and quick release. Confirm these features for the proposed model rather than assuming all hygienic scrapers share them.
Include access, tools, replacement downtime, Thai spare-part availability and instructions understood by local maintenance staff in the comparison. A cleaner that saves routine sweeping but requires dismantling a large guard every time its blade wears may simply shift the maintenance burden.
Design the recovery route, or the dirt just moves
The cleaner removes material from the belt; the line must collect or dispose of that material safely. Decide whether material from the primary rejoins the product stream, whether fines from the secondary fall into a tray, and where liquids drain. If returning material to the process could affect quality, do not use that route. Check chute slope, dead corners, access panels, tray removal posture and capacity.
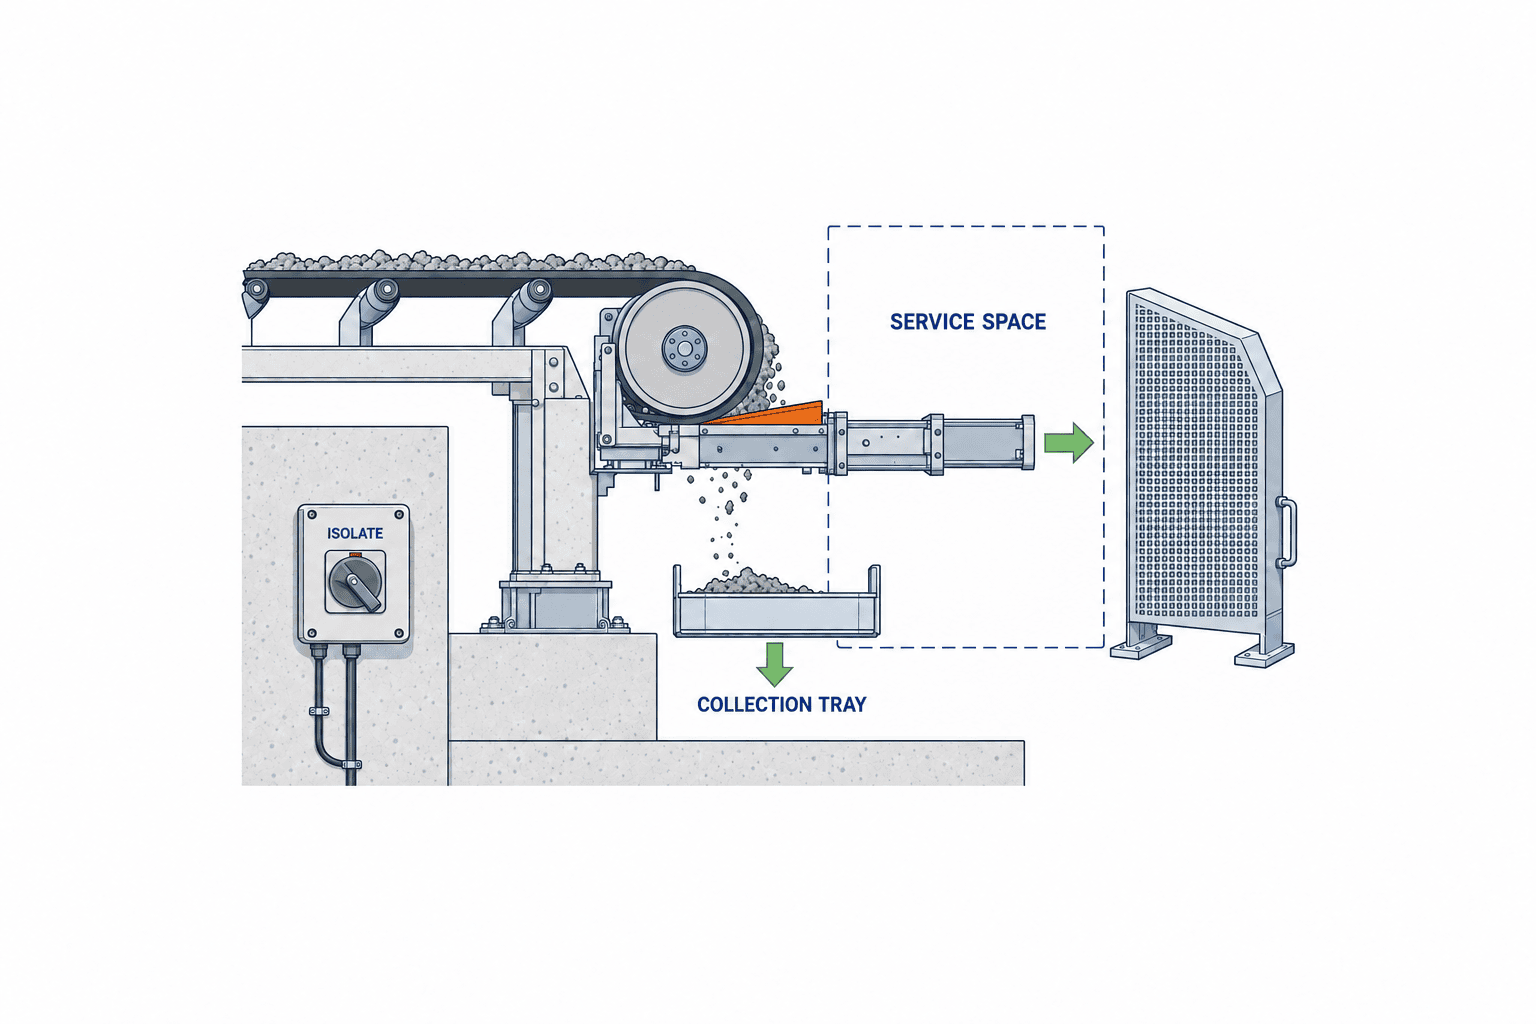
Photograph the entire path from discharge to the first return rollers. A wide shot alone cannot show where scrapings land. A temporary, safely installed catch tray during a controlled trial may reveal dust, wet lumps or liquid splashing that the drawing did not show. Also assess whether a person can remove and empty the tray without entering a moving-machine danger zone.
If cleaning remains poor, revisit tracking, feed bias, overload, damaged belt and chute blockage before condemning the blade. Separate root causes into feed, belt, cleaning and recovery. A blade cannot perform as specified if the belt does not contact it consistently or removed material has nowhere to go.
Make hygiene a separate decision for food and washdown lines
For food or frequent-washdown service, score sanitation independently from residue removal. Define product-contact status, blade material, chemical compatibility, disassembly, hidden soil traps, drainage and post-cleaning inspection. Habasit identifies food-process carryback as a contamination concern and offers a quick-release scraper as one design example. A product page does not certify the whole conveyor. Check documents for the exact model and the factory’s food-contact requirements.
If water or detergent is used, inspect the drainage route and overspray toward motors, sensors and bearings. More water can spread a thin film of residue along the return side. Include cleaning of the blade back and bracket, drying requirements, and a clean storage place for removed parts in the procedure. Specify who verifies cleaning after a product changeover and by which method.
Give the supplier the actual chemical name, concentration, temperature and exposure time. Both belt and blade must be compatible. If a chemical is absent from the compatibility table, treat compatibility as unverified and obtain a written answer or conduct a suitable test. Recheck when the sanitation process changes.
Specify service access and safe isolation
Every blade will eventually need inspection, adjustment and replacement. Require a drawing showing the removal direction, pull-out space, tensioner access and tray removal. Verify it against walls, platforms and adjacent machinery. Register the blade model and compatible spares in the asset record, and have local staff demonstrate the replacement procedure.
Do not plan to adjust or clean a blade by reaching toward a running belt or head pulley. OSHA’s hazardous-energy rule is a US regulation cited here as a safety reference, not as Thai law. It addresses unexpected startup and stored energy during service. Flexco’s P-Type manual also calls for conveyor power lockout, take-up release and belt securing or clearing before work. Follow Thai requirements, site procedures, the equipment manual and the site’s risk assessment. A stop-button press is not the same as isolation and verification.
The work instruction should assign responsibility for shutdown, isolation, stored-energy control, verification, work, guard restoration and restart. Set inspection frequency from actual residue, wear and task records rather than a universal catalogue interval. Record settings and replacement dates so performance does not depend on one technician’s memory.
Write an RFP that exposes the design boundaries
A useful request for proposal describes the symptom and machine, not just a preferred part number. Attach measured dimensions, baseline photos, material samples, operating modes, cleaning method, planned shutdown window and safety constraints. Ask vendors to state both why their model fits and which conditions would make it unsuitable. Require the quote to separate machine modification, guards, chute and collection, controls, installation, commissioning, training and spares.
Compare: (1) compatible belt, splice, speed and temperature; (2) primary/secondary positions and the recovery destination; (3) mounting and service envelope; (4) blade and replacement method; (5) hygiene evidence when needed; (6) guards and isolation; (7) test method and acceptance criteria; and (8) delivery, local support and spares. Do not allow a low price to offset a mandatory food-safety or mechanical-compatibility requirement. If a supplier says “standard fitting,” ask for a dimensioned drawing and adjustment range against the actual machine.
Before ordering, allocate who supplies test instruments, sampling containers, product material, photographs and operators for FAT/SAT. List assumptions and exclusions visibly. This turns a catalogue contest into a comparison of solutions to the same problem.
Use FAT for build checks and SAT for real carryback
Prepare a single test record before starting. Include the machine ID, belt model, material lot and moisture state, speed, run duration, blade material and setting, sample point, collection container, person measuring and photograph numbers. If material changes or the line stops for an unrelated reason, separate that interval. For weight measurements, use the same container tare and sampling duration and prevent material from other processes entering the sample. Where weighing is impractical, select fixed-point photos, buildup area or cleaning labor that the site can keep measuring.
If the test conditions could not be reproduced, do not automatically fail the machine, but do not close that condition as passed. Record an untested high-moisture season, for example, with an owner and date for additional confirmation. Separate passed, conditional and unverified items in the FAT/SAT record. “The equipment ran” and “the carryback target was met” require different evidence. This distinction helps diagnose later failures.
At factory acceptance testing, check model and blade against approved drawings, mounting hardware, adjustment, guards, inspection access, spare parts and documented answers about splice and reverse travel. A FAT without actual product should not certify the line’s future carryback performance. If simulated material is used, record how it differs from the site material.
At site acceptance testing, run the actual belt and product at documented conditions. Compare before and after with the same product, operating duration and sample point. Record floor fallout, collection-bin contents, return-roller buildup, product contamination concerns and cleaning labor as applicable to the RFP. Include representative sticky or wet conditions rather than only the easiest product. Test normal stop/restart and permitted reverse modes. Keep photos, attendees, unresolved findings and retest conditions.
Accept only when cleaning and belt condition are both satisfactory. Check splice passage, abnormal heat or noise, recovery, replacement access and safe maintenance. If pressure is increased during SAT, record the final setting and reassess belt and blade wear. A later change in blade material or position needs a targeted retest.
Keep performance through observation and change control
An operator’s inspection sheet should identify where residue falls, where to take a comparison photo, blade wear, tensioner position, tracking, splice noise and bin condition. Fixed camera angles make trends clearer. Record shutdowns and cleaning time. When outsourced maintenance is involved, assign who can stop the line and who approves adjustments.
Product type, moisture, belt model, splice, speed and cleaning chemicals are selection assumptions. When any changes, ask the supplier to confirm compatibility and rerun relevant SAT checks. Update the drawing, bill of materials, work instruction and spare-part register together. This preserves the reason for the original choice when personnel change.
Troubleshoot the symptom rather than turning up pressure
If residue remains in the center, check effective blade width, center wear, belt sag and material stickiness. If it remains at one edge, investigate tracking, misestimated material path, blade level and frame distortion. Observe contact safely from outside the guarded zone and compare the installed setting with the manufacturer’s instructions. Unrecorded pressure changes destroy the evidence needed to solve the problem.
If cleaning improves but the belt wears, stop treating removal as the only success measure. Look for uneven contact, splice impacts and cover damage. Follow the site’s safe shutdown procedure for inspection, then review angle, position, pressure, tensioner, blade material and belt condition. If dirt shifts from floor to another point, trace the whole recovery path: chute rebound, overflowing tray, splash or spillage when the bin is emptied. A tray that can only be removed during a stop must have capacity matched to the stopping schedule.
If performance deteriorates after a few weeks, compare material, moisture, tracking, tensioner, splice and chemicals with the commissioning record. Log who changed which setting and the installed spare-part number. A symptom-based checklist makes troubleshooting less dependent on one experienced worker.
Compare lifecycle cost with explicit assumptions
Put equipment, installation, planned downtime, consumables, cleaning labor, residue disposal and possible belt or roller effects on the same time horizon. Mark unmeasured items as assumptions. A low-price cleaner may require expensive inspection hatches or chute work; an elaborate system may exceed the actual requirement. Compare post-installation cleaning time and stoppage causes with the measured baseline. If belt replacement, product mix or feed rate also changed, do not attribute their entire effect to the cleaner.
Any payback estimate should state days of operation, labor rate, spare-part cost and disposal assumptions. Do not transfer a supplier case study’s removal rate or payback period to your line. Purchasing needs a comparison that can be recalculated when conditions change.
Common selection mistakes
Common failures are: fitting a hard blade before diagnosing tracking or splice issues; omitting the recovery route; treating a catalogue maximum as guaranteed site performance; ignoring blade pull-out space and isolation; assuming a removable food-grade part alone proves hygienic operation; failing to declare cleats or reverse travel; and collecting no baseline before SAT. The remedy is consistent: capture the real machine data, document supplier applicability and accept against the same test conditions.
Where this decision fits in conveyor design
If the transport method itself is still in question, start with conveyor design and material handling to define load, throughput, environment, layout and interfaces. If pallets or heavy fixtures make the support method the primary issue, chain conveyor selection is a separate decision. This article addresses residue on a belt after a belt conveyor has been chosen for good reasons.
FAQ: choosing a belt conveyor cleaner
Do we need both a primary and a secondary cleaner?
Not always. A primary alone may meet the site’s target; finer residue may justify a secondary. Compare layouts against the actual material, recovery path and acceptance target. Do not adopt a generic removal percentage as your guarantee.
What should we check first when comparing scrapers?
Belt and splice compatibility, residue properties and available mounting position. If any one fails, price and blade hardness are secondary. Give the vendor photos, dimensions and operating modes, and request documented applicability.
Can a standard blade clean a cleated belt?
Do not assume so. Cleats may strike the blade. Dedicated products exist, but the cleat geometry and permitted contact area still need a model-specific check and trial.
Is a cleaner alone enough to solve carryback?
Often no. Feed bias, mistracking, belt damage, chute problems and collection overflow may remain. Treat feed, removal, recovery and cleaning as one process.
What differs between belt-cleaner FAT and SAT?
FAT confirms the supplied build, adjustment, guarding, spares and documented applicability. SAT checks residue, belt condition and maintenance on the real line under representative products and operating modes.
Summary
Select a conveyor belt cleaner by recording the carryback symptom and target, collecting belt and material data, designing primary/secondary positions and recovery, comparing service and hygiene requirements in an RFP, then accepting the build in FAT and real performance in SAT. In a Thai plant, include local replacement access, instructions and spare parts within the project scope.
If the site has residue photos but not a complete specification yet, contact TOMAS TECH. We can help identify what to measure for a retrofit or a new conveyor design before asking vendors for firm proposals.


