


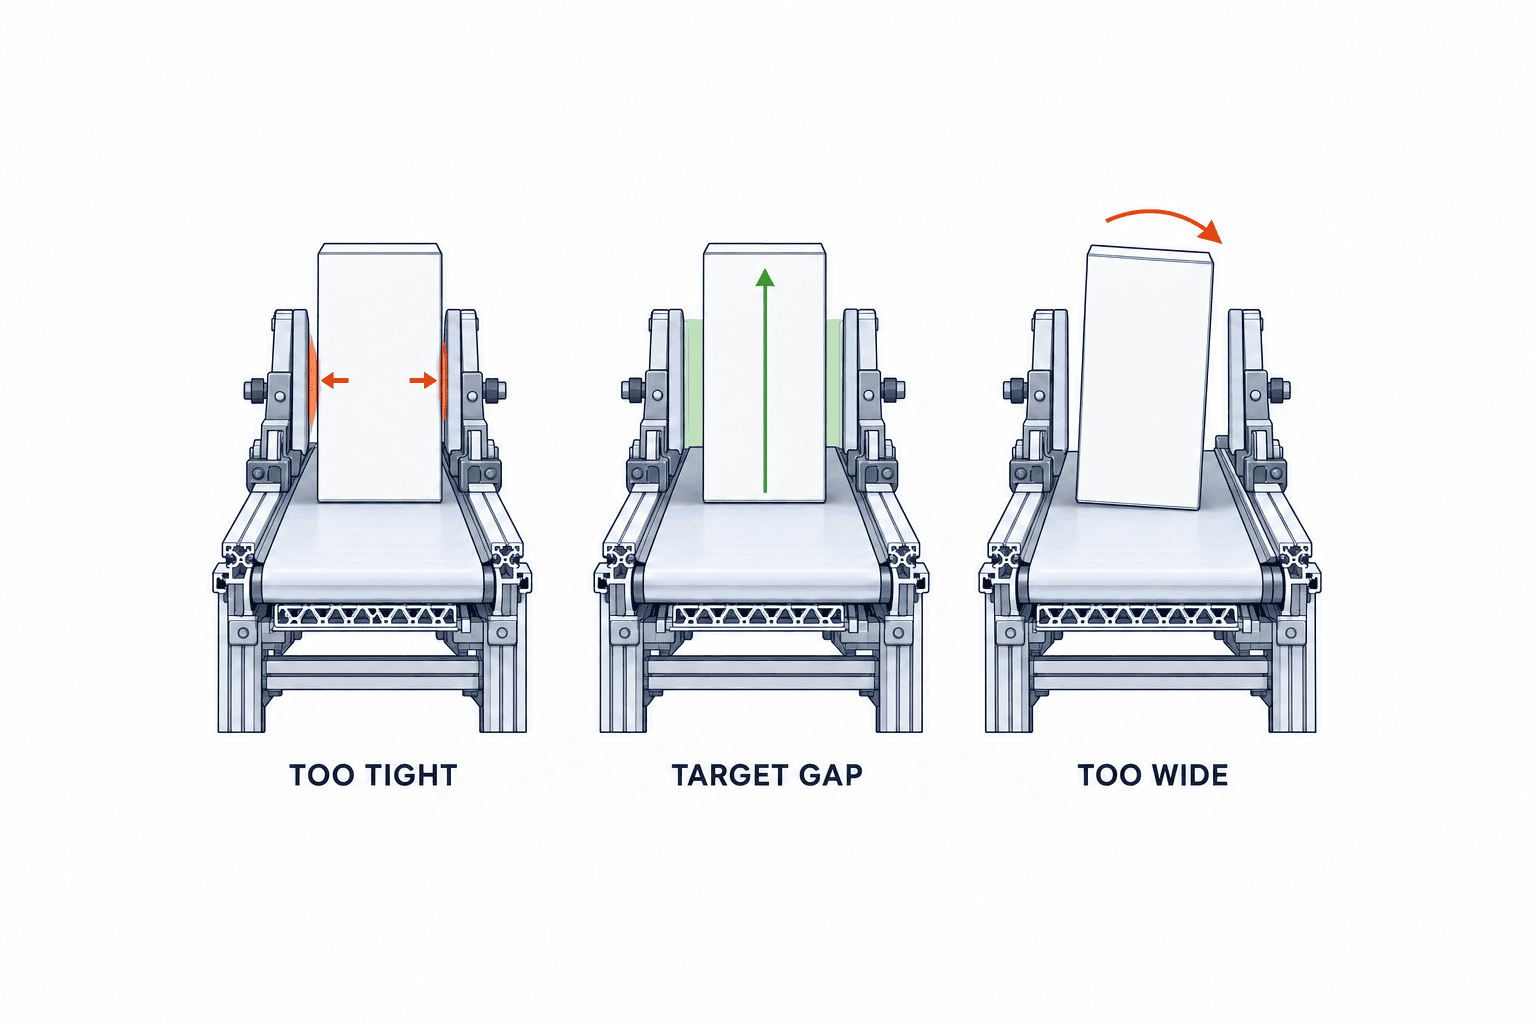
A side guide is often added after a conveyor has been selected: “Put a rail on both sides so the product cannot fall.” That simple instruction can create new problems. A narrow opening scuffs cartons and stops bottles; a wide one lets tall products tip at a curve or transfer. If every SKU change requires a tape measure and repeated manual adjustments, the true changeover cost never appears in the quotation. Side guides define contact between the load and the line. They deserve their own specification and acceptance test.
This guide is for production engineering, maintenance and procurement teams at Thai factories. It focuses on guide opening, contact height, wear, cleaning, changeover, and acceptance for belt, chain and roller conveyors. For broader equipment choices, see our chain conveyor selection guide and roller conveyor selection guide.
Decide what each section must do
The same rail can have three very different jobs. A retention guide normally stays clear of the product and catches it only when it wanders. A tracking guide makes gentle, controlled contact to limit lateral motion. A datum guide intentionally locates a product against one side for printing, labelling, inspection or robotic pickup. The third case also depends on belt friction, product base, and any lateral pusher. Closing the guide gap is not a substitute for positional control.
Label each section of the line “non-contact retention,” “light-contact guidance,” or “single-side datum” in the request for proposal. Ask bidders to indicate expected contact at straights, curves, merges, diverges, accumulation zones and transfers. This makes quotation comparisons meaningful. Two offers with the same metres of rail may deliver different functions.
Measure the moving product envelope
Record each SKU’s minimum and maximum width, length, height and mass. Include base shape, centre of gravity, stiffness, surface finish, moisture, oil, temperature, handles and packaging seams. A soft bag, bulging carton, moulded tray and wheeled fixture may have moving envelopes quite different from their nominal drawings. If a product can yaw, include its projected width at the worst plausible angle. Also note whether it travels full or empty and whether packaging changes between suppliers or lots.
Consider an illustrative carton with measured width 176–184 mm, up to 3 mm of extra bulge on each side and 2 mm of lateral setup uncertainty per side. A 184 mm opening cannot be justified for non-contact retention simply because 184 mm is the maximum nominal measurement. Add the dynamic allowances, then decide how much free space is appropriate for the required function. These numbers are an example of calculation inputs, not a universal clearance recommendation.
Measure more than one sample. Include tolerance extremes, loaded and unloaded cases, dry and wet conditions and restart after an accumulation stop. Film seams or labels may rub only when a carton rotates. Record video of the worst products at normal and maximum speeds, on start and stop, and at the transfer to downstream equipment. Those same samples and conditions should reappear in FAT and SAT.
Set the gap at the product contact face
Opening width must account for the largest moving envelope, lateral conveyor movement, mounting error, product yaw and the guide’s purpose. A centred product can use a symmetric allowance. A single-side datum needs a specified contact condition on one side and a different escape allowance on the other. The acceptance criterion should include finish quality and contact time, not only whether products continue moving. A line that transports every carton while rubbing off its print has failed.
Dimension the distance between the actual contact faces in the drawing, not only between brackets. Identify measurement stations at entry, midspan, exit, curve entry and curve exit. Provide a datum or gauge that maintenance can use after liner replacement. For adjustable rails, specify the full SKU setting table and prove that rail parallelism remains acceptable after locking. “Adjustable” without repeatable settings is not enough.
Dorner lists an adjustable lane guide for its 2200 belted conveyors with a UHMW contact surface, anodized aluminium mounting rail and adjustment knobs. Its listed 6 mm minimum lane width and 127 mm maximum part height apply to that product configuration; they are not general conveyor clearances. Check the exact model and load before using catalogue dimensions in a project. Dorner 2200/2700 accessories.
Choose contact height and profile
A low rail may allow the top of a tall box to sway. A high rail applying too much lateral force can rotate a light container about its base. Choose contact height with the centre of gravity, support surface, curve speed, liquid movement and product stiffness in mind. Check the leading and trailing corners of long cartons. Flared entrances, smooth transitions, shaped end caps and continuous contact liners can reduce snagging. A short product can lose one side of support at a joint and change posture suddenly.
Guides cannot fix an unstable product base. On a roller conveyor, check roller pitch, product bottom and travel orientation. On a chain conveyor, check sliding and catching at the product base. Tightening the rail can convert the chain’s conveying force into side-face friction and heat. The conveyor and the guide must be assessed as one system.
Interroll offers aluminium and polymer side guides for belt and roller conveyors, including use through curves and merges. Its published 40 × 15 × 2,000 mm dimension identifies its own profile. Its accessory data sheet also describes a contoured end cap intended to prevent products catching on a rail end. That is a useful reminder to specify connectors and end details, not just straight rail length. Interroll product page and Interroll data sheet.
Treat straights, curves and transfers separately
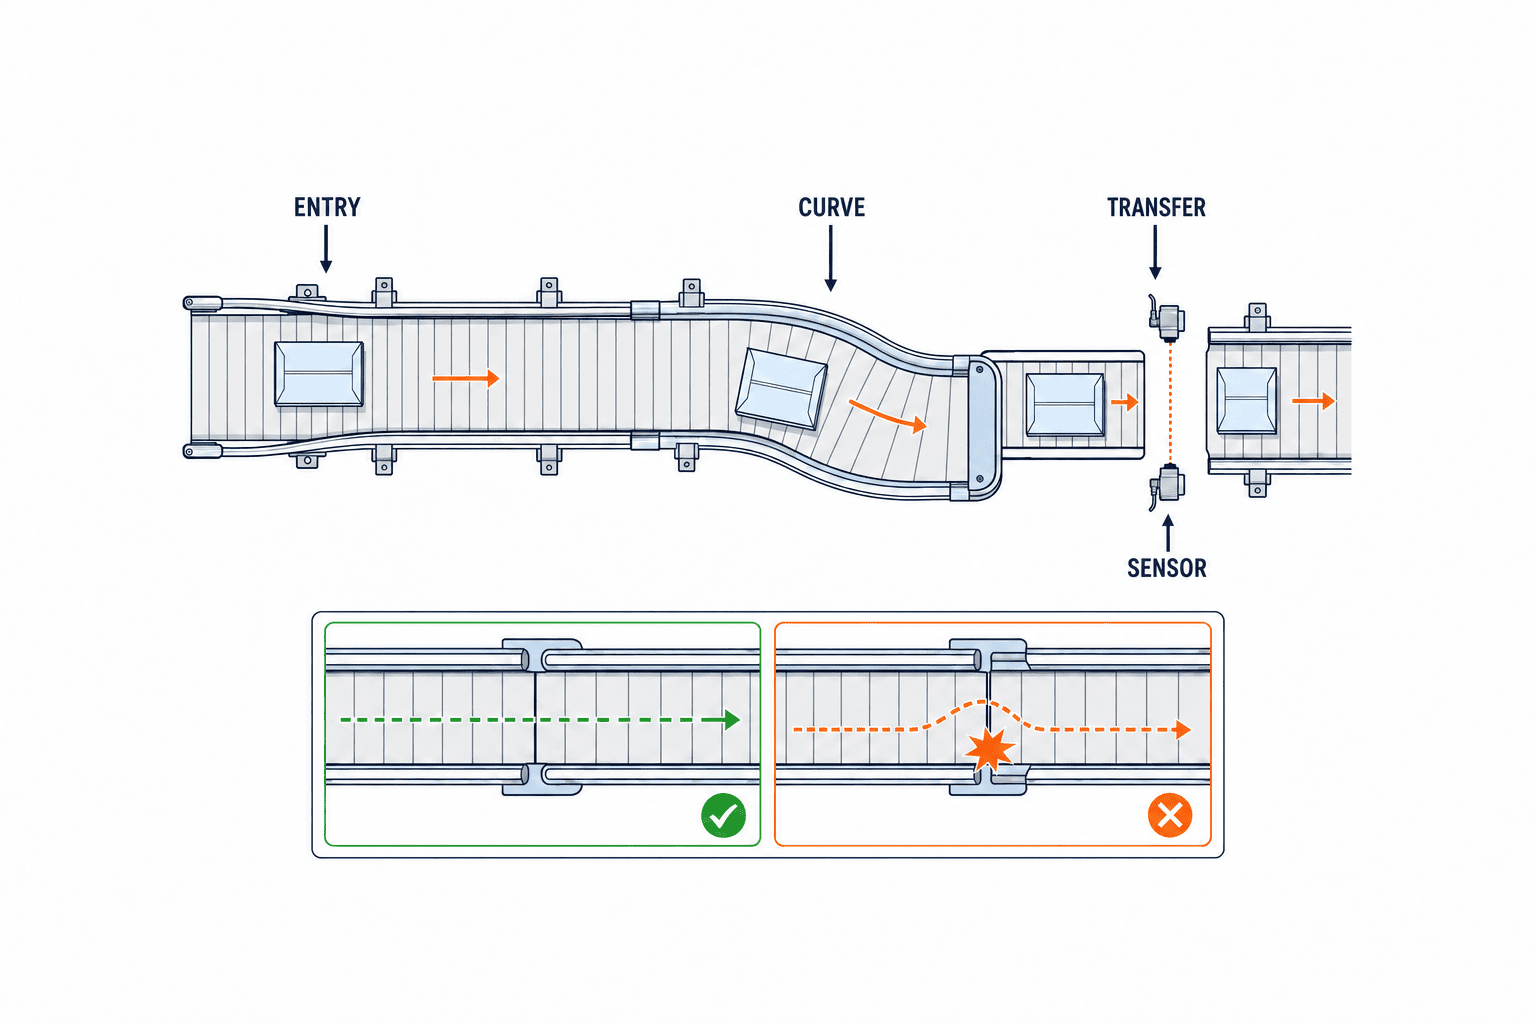
On straight runs, review parallelism, local waviness and bracket deflection. In a curve, a rectangular product’s front and rear corners trace different paths. Copying a straight-line opening into a tight radius may scrape the inside corner of the longest carton. Test both longest and shortest products and map contact points using video. Follow the actual product envelope; matching the visual symmetry of two rails is not the goal.
Merges and diverts can create pinch points. Transfers add another combination of gap, speed difference, elevation difference and discontinuous rail support. A higher guide cannot compensate for a product base that is unsupported across a transfer. Consider a transfer plate, small roller or receiving-side speed before modifying the rail. Assess success as “no tip, no jam, no surface damage, reliable photoeye detection and correct orientation for the next operation,” not simply “no fall.”
Select fixed or adjustable guides from changeover needs
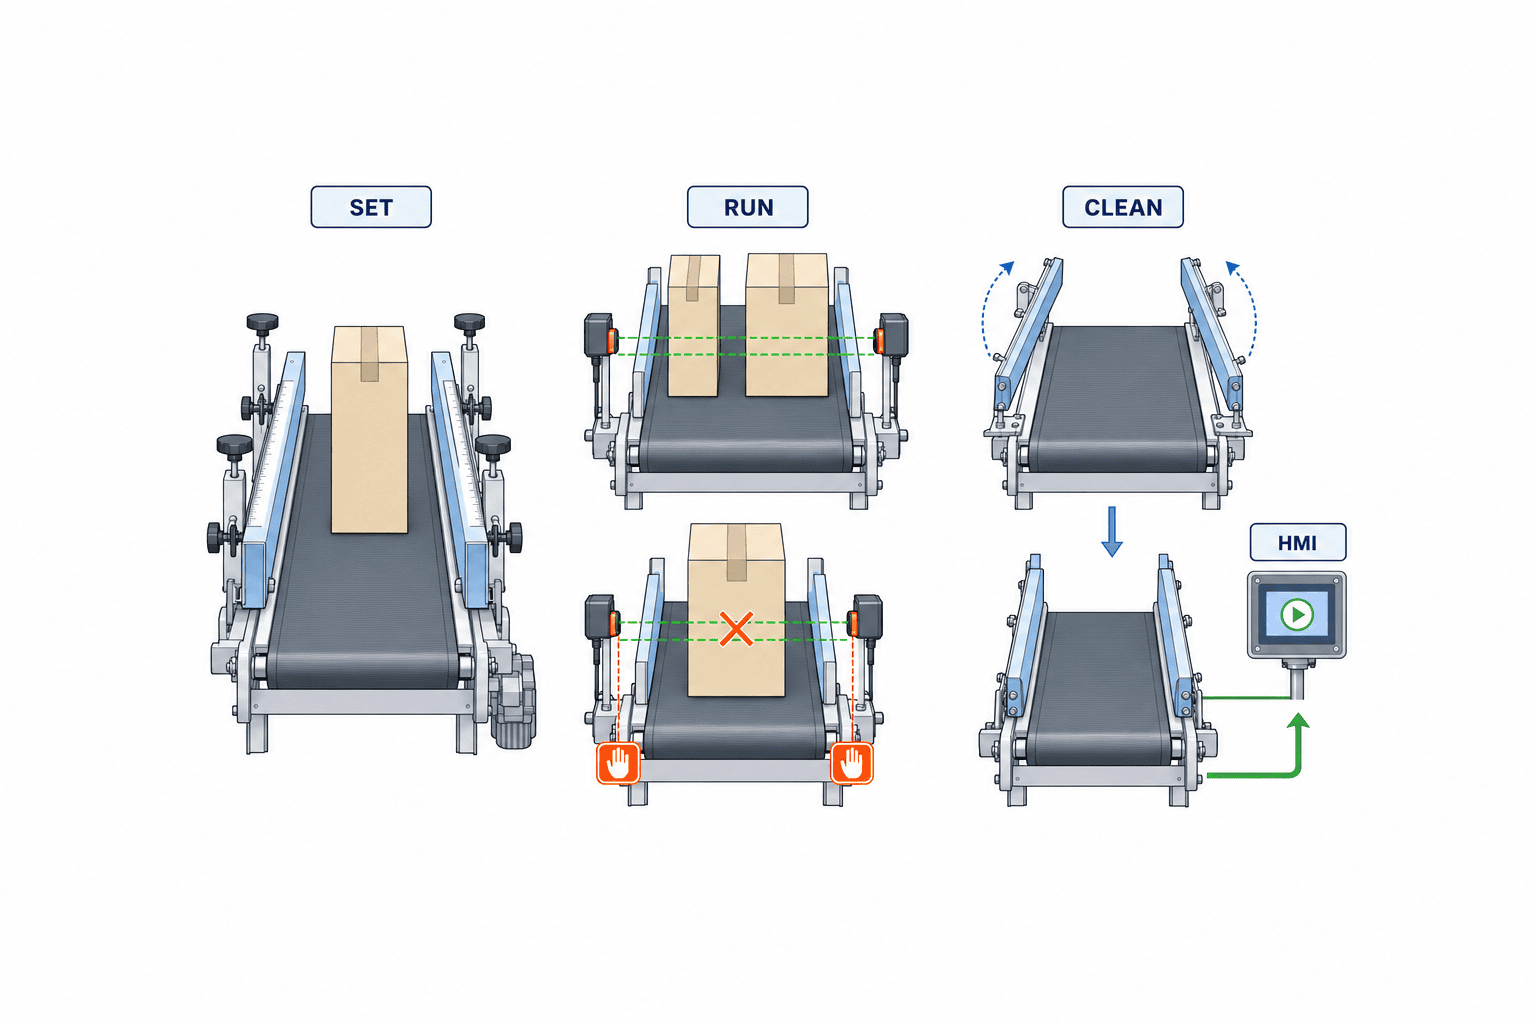
A fixed rail can be simple where few products share a narrow size range. An adjustable rail suits a wider mix only if operators can set it repeatably. Specify whether both sides move together or one side remains the datum; whether settings can be read clearly; whether a tool is needed; whether locking shifts the rail; and how the setting is restored after cleaning. A slotted bracket alone does not deliver a fast changeover.
Time a real SKU change from the last product of the previous run to the first accepted product of the next. Include rail movement, speed recipe, sensor setting, trial pieces and quality sign-off. A three-minute target, if used, should come from your production plan and contract; it is not an industry-wide equipment value. Repeat the change ten times to observe setting variation as well as the first successful setup. A motorized guide adds position sensing, jam protection, power-loss recovery and PLC recipe checks to the specification.
Compare friction, wear and cleaning
Contact materials may include UHMW-PE liners, stainless steel and aluminium. Habasit describes UHMW-based guide and wear-strip profiles with low friction, wear resistance, low noise and chemical resistance. Those are material and product characteristics, not a guarantee against scuffing with every package, detergent and temperature. Test actual products for print rub, dust, transfer, static and liner wear. Prefer a replaceable contact strip where recurring wear is expected, and keep screws out of the contact face. Habasit HabiPLAST guide catalogue.
For washable lines, inspect the back of the rail and bracket roots for trapped soil. Dorner’s AquaGard range illustrates hinged stainless guides that open access to the belt and adjustable hinged options. That is an example of a cleaning-oriented design, not proof that a particular installation meets your hygiene requirements. Specify opening or removal steps, required tools, drainage, detergent compatibility, cleaning time and how the operating position is restored. Dorner AquaGard accessories.
Keep product guidance separate from personnel protection
A product side guide is not automatically a machine guard. Reach-in and pinch hazards at rollers, belts, chains and adjustable supports require their own risk assessment. ISO 14120:2015 covers general requirements for guards against mechanical hazards; ISO 13857:2019 addresses safety distances for preventing access to hazard zones. Neither gives a single safe side-guide height for every line. Evaluate access during operation, cleaning and recovery, then specify covers, stop functions, interlocks and lockout where required. ISO 14120 and ISO 13857.
Put measurable conditions into the RFP
Send vendors the SKU range and measured envelope, actual product samples, photos of sides and bases, speeds, stops, accumulation conditions and line drawings. Identify available frame mounting points, maintenance access, washing procedure, controls and allowed installation shutdown. Describe each section’s intended function and show every curve, merge, divert and transfer.
| RFP item | Define before quotation | FAT/SAT evidence |
|---|---|---|
| Product range | Size extremes, mass, bulging, projections | Samples and measurement record |
| Guide function | Retention, light contact or datum | Section-by-section operating video |
| Geometry | SKU openings, contact height, adjustment range | Drawings and measurements |
| Running conditions | Speed, starts, stops, accumulation, curves | Worst-case continuous run |
| Product finish | Acceptable rub, scratch, dust and label damage | Before/after photos and agreed samples |
| Changeover | Tools, steps, time and repeatability | Repeated setup trial |
| Maintenance | Opening, cleaning, liners and spare parts | Demonstration and parts list |
| Safety | Pinch points, guarding, stop and restart | Risk review and test log |
Break down quotations into straight rail, formed curves, transfer entrances, end caps, bracket spacing, liners, sensors, installation and commissioning. Ask who owns custom drawings and how quickly a damaged rail can be replaced locally. Initial price does not describe lifetime availability.
Define FAT and SAT before ordering
Use FAT for a pre-shipment functional test at the maker and SAT for site acceptance after the system is connected to the real line. Contract language must define the test scope. In FAT, run the minimum and maximum widths, high-centre-of-gravity product, longest product and most easily marked package. Combine normal and maximum speed with stopping, restarting, accumulation release, curves, transfers and changeovers.
Record sample count, tips, jams, manual rescues, visible damage, measured rail setting and changeover time. “Ran without problems” is not a measurable result. If a project specifies 100 units of each SKU at each speed and zero tips, 100 is a project-agreed sample count, not a universal assurance level. Agree on scratch photos, lighting, inspection distance and pass/fail examples before testing.
In SAT, repeat product tests with the real upstream and downstream heights, speed synchronization, humidity, dust, installed frame tolerance and operator access. Test cleaning and reassembly, liner replacement, power restoration, emergency stop recovery and restart. Handover documents should include as-built drawings, SKU settings, spare parts, cleaning instructions and inspection intervals.
Pilot before finalizing the rail
A short adjustable test fixture can reveal more than a catalogue. Run real products at width and mass extremes, varied fill levels and the most unstable centre of gravity. Change gap and contact height separately. Record video, surface photos, speed, material, lot, temperature and any rescue intervention. CAD can help with geometric envelope; film scuffing, wet bases and carton deformation still need physical trials. Check a range of positions around the best setting so a tiny mounting error does not destroy performance.
Include operating cost in the decision. Annual changeover labour, damaged products, stoppage recovery, liner replacement, cleaning access and imported spare lead time may outweigh the rail purchase price. Estimate savings from your own changeover count and loss records rather than a generic percentage. Specify rail section, liner, bracket, knob, end cap and curved spare in the bill of materials, plus a measurement datum to restore the setting after repair.
Five avoidable failure patterns
A fixed rail opened for the widest carton may allow the smallest carton to rotate in a curve or drift away from the inspection datum. The remedy is to define the function of each section and a verified setting for every SKU, rather than closing every guide indiscriminately. Where one setting must cover a family of products, test both ends of the size and centre-of-gravity range.
A drawing that dimensions only the clear straight section misses the entrance and every modular joint. A carton corner, a label edge or a moulded tray foot can catch an exposed rail end. Specify a flare, end cap or smooth transition, show where each joint sits relative to the product path, and inspect those points in FAT video. A good straight-line trial does not prove a curve or transfer.
A wear-resistant liner does not eliminate maintenance. It can generate dust, develop a groove or expose a fastener; a loose support can shift the contact face. Define observation points and replacement limits with the supplier. After replacing a worn liner, the opening may become narrower again. Measure it and rerun representative product before restarting production.
A guide built to stop products falling does not replace personnel guarding. The pinch and reach hazards at a moving belt, chain, roller or adjustable bracket need a separate risk review. Cleaning and jam recovery must be included in that review, since operators may open or move the guide when the line is stopped.
Testing only the easiest carton in FAT leaves the highest-risk combinations unseen. Include the smallest and largest widths, long cartons, high centre of gravity, wet or deformable bases and surfaces prone to marking. If no single sample covers every extreme, make a matrix of separate trials. Record manual rescues as failures rather than removing them from the count.
Turn the SKU setting table into a shop-floor instruction
A table containing only opening widths is prone to mis-setting. For each SKU, record the product and packaging revision, datum side, left and right scale positions, measurement station, order in which brackets are adjusted, locking check, test quantity and sign-off. Where entry and exit settings differ, use separate rows. A photo or setting gauge should let an operator verify the actual contact faces after adjustment.
A new SKU is not automatically qualified because its nominal width is between two existing products. Check its base, centre of gravity, packaging stiffness, label location, surface finish and speed. Use a similar product setting as a starting point, then run the new product and approve a new row. Keep approver, date and reason for revision. If an electric guide is linked to PLC recipes, confirm that position reached, lock engaged, SKU identity and downstream ready signals are checked before starting. Sensor position alone does not replace a physical opening measurement.
Diagnose jams and wear before widening the rails
Record where and when a failure occurs. Marking only at the entrance points to a flare or end-detail issue. Repeated damage at the outside of a curve suggests speed, lateral motion or bracket deflection. A jam only after stop and restart suggests accumulated side pressure or downstream release timing. A problem immediately after SKU change suggests setting repeatability or a missed lock. This simple mapping helps distinguish a rail redesign from a conveying-control issue.
Inspect the same points regularly for gloss changes, grooves, particles, chipped ends and loose brackets. A worn liner may increase the gap and reduce datuming accuracy, even if it lowers rubbing. A new liner may narrow the gap and raise contact force. Measure and run an approved sample after replacement. Agree replacement limits for the actual material and quality requirement; catalogue claims about wear resistance cannot establish the inspection interval for a particular plant.
Compare lifetime cost, not only purchase price
Include yearly labour for changeovers, scrapped packs, jam recovery, liner replacement, cleaning access, spare-part lead time and line shutdown for installation. If a design saves five minutes per change, calculate value from the factory’s actual number of changes, lost productive time and staffing. Do not assume an annual saving before measuring the baseline. Similarly, distinguish guide-caused damage from damage elsewhere in the line using pre-installation video and logs.
The spare-parts list should identify rail profile, liner, curved section, end cap, bracket and knob by model and material. Check whether left and right parts are interchangeable, whether a straight section can be cut locally, and whether a curved piece must be imported. Handover should include a measurement datum so maintenance can restore gap and height after repair. A one-off setting achieved during commissioning is not a maintainable production system.
Questions to ask each vendor
Ask, with a drawing in front of both parties: Where do the smallest and largest products touch a rail? Where does a yawed carton corner go on entry? At which curve or transfer does the rail stop, and how is the gap bridged? How long does a liner change take, with what tools, and how is the setting restored? Can the system detect an incorrect SKU setting? Which real products are used in FAT, and what conditions are added in SAT? Written answers expose differences hidden by identical “side guide set” line items.
Add each bidder’s exclusions to the same RFP comparison sheet. One supplier may include only straight rails; another may include hinged cleaning access, end details and site adjustment. Compare the total price after bringing offers to the same scope, including shutdown, training, spares and measuring gauge. A custom curve or motorized adjustment is worthwhile only when its function and maintenance obligations are explicit.
Monitor the first production weeks
FAT and SAT use planned samples, while production brings different packaging lots, operators, post-cleaning conditions and night temperatures. Record SKU, guide setting, jam and tip counts, scuff defects and replaced parts together. Mark each failure by entry, straight, curve, merge, transfer or exit. If a defect appears, do not quietly widen rails or slow the line and call the job complete. Document the before/after setting, speed, sample count and finish judgement; rerun the smallest and largest SKUs sharing the line.
Compare measured opening at the same stations against the handover baseline during routine maintenance. Worn liners can widen the opening and impair printing or inspection alignment; a loose bracket can move one local section inward while the average width still looks correct. Attach photos and location IDs to inspections. When adding an SKU, confirm the base, centre of gravity, label and surface as well as nominal dimensions before approving a new setting.
Common questions
Should the guide always touch the product? No. Retention may require a gap during normal travel. Datuming requires controlled contact. State the desired function first.
Is there a universal clearance allowance? No. Product tolerance, yaw, conveyor movement and the purpose of contact vary. Catalogue minimum adjustment width is not a recommended clearance for your SKU.
Can guides be retrofitted? Often, after verifying frame stiffness, mounting face, belt or roller width, transfer geometry, guarding and maintenance access. Include plant shutdown and site commissioning in the quote.
Is stainless steel enough for a cleanable line? Material alone is insufficient. Check access behind rails, drainage, tooling, chemical compatibility and repeatable setting after cleaning.
For a Thai plant with tipping, scuffing, jams or long changeovers, share your product dimensions, line video, existing drawings and target SKUs through our contact page. TOMAS TECH can help turn those observations into a side-guide specification, quotation comparison and FAT/SAT acceptance plan.


